Access-Control-Allow-Origin: *

サーバー

Canon・MP630複合機のスキャナをネットワークで共有する(CentOs)

最初一般的なyumでインストールを試みた

# yum install sane

# sane-find-scanner -q
found USB scanner (vendor=0x04a9 [Canon], product=0x172e [MP630 series]) at libusb:001:002

認識している

次に
# scanimage -L

No scanners were identified. If you were expecting something different,
check that the scanner is plugged in, turned on and detected by the
sane-find-scanner tool (if appropriate). Please read the documentation
which came with this software (README, FAQ, manpages).

まったく認識しない。

vi /etc/sane.d/canon630u.conf

usb 0x04a9 0x172e を記述してもダメだった。
これで丸二日間ハマり、他にも手当たり次第思いつきで試したがとうとうギブアップ。
仕方なく違う方法にした。

Supported Scanners - Search Engine
に下記の記述がありMP630はサポートされているはず。
pixma ??? 0.16.1 ??? Canon ??? PIXMA MP630 ??? USB ??? 0x04a9/0x172e ??? complete
?
https://alioth.debian.org/frs/?group_id=30186から
sane-backends-1.0.21.tar.gzをダウンロード

tar zxvf sane-backends-1.0.21.tar.gz
cd sane-backends-1.0.21

Quick install:
==============
./configure
make
make install
==============
インストール完了

次に設定です。
ファイルのディレクトリが違うので要注意。

vi /usr/local/etc/sane.d/saned.conf
下記を追加(アクセスできるネットワークIP)
# NOTE: /etc/inetd.conf (or /etc/xinetd.conf) and
# /etc/services must also be properly configured to start
# the saned daemon as documented in saned(8), services(4)
# and inetd.conf(4) (or xinetd.conf(5)).
192.168.2.0/24
127.0.0.1

# sane-find-scanner -q
found USB scanner (vendor=0x04a9 [Canon], product=0x172e [MP630 series]) at libusb:001:002

vi /usr/local/etc/sane.d/canon630u.conf
# Autodetect the Canon CanoScan FB630u
usb 0x04a9 0x172e ←確認

vi /usr/local/etc/sane.d/canon.conf
そのまま変更なし
#canon.conf
/dev/scanner
#/dev/sg0

ネットワークに接続する
vi /etc/xinetd.d/sane-port
service sane-port
{
??? disable???? = no
??? port??????? = 6566
??? socket_type = stream
??? wait??????? = no
??? user??????? = root
??? server????? = /usr/local/sbin/saned ←注意
}

service xinetd restart superdemonとして再起動

テストをしてみる
# scanimage -L
device `pixma:04A9172E_4063FD' is a CANON Canon PIXMA MP630 multi-function peripheral
これでOK。

注意:
libusbは /dev ではなく /proc/bus/usb/ を使用しているようだ
一般ユーザーでアクセスできない場合は
chmod 666 /proc/bus/usb/
それでもダメなら
chmod -R 666 /proc/bus/usb/

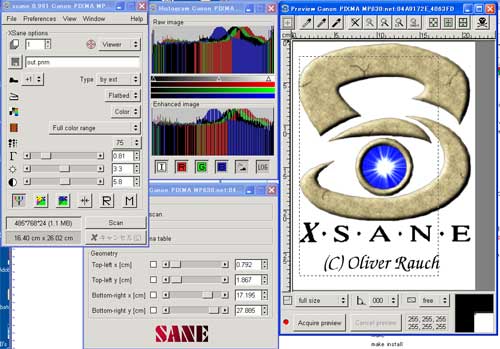
最後にwindowsXPにxsaneをインストール・実行

参考サイト
http://raijin.ddo.jp/pukiwiki/pukiwiki.php?%A5%B9%A5%AD%A5%E3%A5%CA%B6%A6%CD%AD
?

予約フォームでPCクライアントと携帯クライアントに振り分ける

予約フォームでPCクライアントと携帯クライアントで違うフォームを用意した。

以下のサイトを参考にしてみた。
PHPでPCサイトと携帯サイトの振り分け方
http://astrodeo.com/blog/archives/129

*********************index.php*****************************

<?php
//ユーザーエージェントの判別
function isKeitai() {
??? //NTT DoCoMo
??? if (preg_match("/DoCoMo/", $_SERVER['HTTP_USER_AGENT'])) return true;
??? //旧J-PHONE?vodafoneの2G
??? if (preg_match("/J-PHONE/", $_SERVER['HTTP_USER_AGENT'])) return true;
??? //vodafoneの3G
??? if (preg_match("/Vodafone/", $_SERVER['HTTP_USER_AGENT'])) return true;
??? //vodafoneの702MOシリーズ
??? if (preg_match("/MOT/", $_SERVER['HTTP_USER_AGENT'])) return true;
??? //SoftBankの3G
??? if (preg_match("/SoftBank/", $_SERVER['HTTP_USER_AGENT'])) return true;
??? //au (KDDI)
??? if (preg_match("/PDXGW/", $_SERVER['HTTP_USER_AGENT'])) return TRUE;
??? if (preg_match("/UP\.Browser/", $_SERVER['HTTP_USER_AGENT'])) return true;
??? //ASTEL
??? if (preg_match("/ASTEL/", $_SERVER['HTTP_USER_AGENT'])) return true;
??? //DDI Pocket
??? if (preg_match("/DDIPOCKET/", $_SERVER['HTTP_USER_AGENT'])) return true;

??? return false;
}

//PCと携帯とで振り分ける
if(isKeitai() == false){
?? header("Location:?https://hostname.co.jp/xxxxxxxx/pc.php");
}else{
?? header("Location:?https://hostname.co.jp/xxxxxxxx/keitai.php");
}
?>

Fedora7にRed5をインストール

Fedora7にRed5をインストール

気になっていたRed5サーバーをインストールしてみた。その記録です。

Javaのインストール

http://java.sun.com/javase/ja/6/download.html

よりJava SE Development Kit (JDK)・JDK 6 Update 17をダウンロード、インストールします。

antのインストール(入っていなければ)。

Red5のインストール
http://code.google.com/p/red5/
Red5 0.9.0 RC2 (03 November 2009)のTarballをクリック
***********ここから*****************
mkdir /opt/red5/
cd /opt/red5/
tar zxvf ~/red5-0.9.RC2.tar.gz
cd /opt/red5
./red5.sh &
***********ここまで*****************
ps aux | grep red5 <?動作確認

Flowplayerのインストール
http://flowplayer.org/plugins/streaming/rtmp.html から flowplayer.rtmp-3.1.3.zip をダウンロード
flowplayer.rtmp-3.1.3.zip から flowplayer.rtmp-3.1.3.swf を取得
flowplayer.rtmp-3.1.3.swf を /opt/red5/webapps/root に移動

http://flowplayer.org/download/index.html から フリーのものをダウンロード
flowplayer-3.1.5.zipを解凍

flowplayer-3.1.5.swf
flowplayer-3.1.4.min.js
を /opt/red5/webapps/root に移動

flowplayer-3.1.4.min.js
style.css
を 同じく /opt/red5/webapps/root に移動

?index.html を index_.html に変えて
/opt/red5/webapps/root/demos に移動

この index_.html をテンプレートとして利用します。

**************ここから**********************
<html><head>
<meta http-equiv=”content-type” content=”text/html; charset=UTF-8″>
<!? A minimal Flowplayer setup to get you started ?>

<!?
include flowplayer JavaScript file that does
Flash embedding and provides the Flowplayer API.
?>
<script type=”text/javascript” src=”../flowplayer-3.1.4.min.js”></script>

<!? some minimal styling, can be removed ?>
<link rel=”stylesheet” type=”text/css” href=”../style.css”>

<!? page title ?>
<title>Minimal Flowplayer setup</title>

</head><body>

<div id=”page”>

<h1>Minimal Flowplayer setup</h1>

<p>View commented source code to get familiar with Flowplayer installation.</p>

<!? this A tag is where your Flowplayer will be placed. it can be anywhere ?>
<a
style=”display:block;width:520px;height:330px” <??最上部の一行を削除した(width:520px;height:330pxは適当に変更)
id=”player”>
</a>

<!? this will install flowplayer inside previous A- tag. ?>
<script>
flowplayer(“player”, “../flowplayer-3.1.5.swf”, { <??ここから改造します

clip: {
url: ‘momo01′,
// configure clip to use influxis as our provider, it uses our rtmp plugin
provider: ‘rtmp’
},

// streaming plugins are configured under the plugins node
plugins: {

// here is our rtpm plugin configuration
rtmp: {
url: ‘../flowplayer.rtmp-3.1.3.swf’,

// netConnectionUrl defines where the streams are found
netConnectionUrl: ‘rtmp://example.com/oflaDemo’
}
}
});
</script>

<!?
after this line is purely informational stuff.
does not affect on Flowplayer functionality
?>

<p>
If you are running these examples <strong>locally</strong> and not on some webserver you must edit your
<a href=”http://www.macromedia.com/support/documentation/en/flashplayer/help/settings_manager04.html”>
Flash security settings</a>.
</p>

<p>
Select “Edit locations” &gt; “Add location” &gt; “Browse for files” and select
flowplayer-x.x.x.swf you just downloaded.
</p>

<h2>Documentation</h2>

<p>
<a href=”http://flowplayer.org/documentation/installation/index.html”>Flowplayer installation</a>
</p>

<p>
<a href=”http://flowplayer.org/documentation/configuration/index.html”>Flowplayer configuration</a>
</p>

<p>
See this identical page on <a href=”http://flowplayer.org/demos/example/index.htm”>Flowplayer website</a>
</p>

</div>
**************ここまで**********************

画像を/opt/red5/webapps/oflaDemo/streams に移動する。
これで見れるはず
外部のPCから

http://サーバー名:5080/demos/*********.html(任意)

http://stream.image-house.co.jp:5080/demos/momo2009-02-01.html
http://stream.image-house.co.jp:5080/demos/momo2009-02-02.html
http://stream.image-house.co.jp:5080/demos/momo2009-02-03.html
http://stream.image-house.co.jp:5080/demos/momo2009-02-07.html
http://stream.image-house.co.jp:5080/demos/momo2009-02-08.html
http://stream.image-house.co.jp:5080/demos/momo2009-04-16.html
http://stream.image-house.co.jp:5080/demos/momo2009-04-22.html
http://stream.image-house.co.jp:5080/demos/momo2009-09-19.html
http://stream.image-house.co.jp:5080/demos/momo2009-12-12.html

注意:ルーター・ファイヤウォールそれぞれポートを開けてください。
最低限: 5080 と 1935

追記:こちらもご覧ください
red5再構築
https://www.image-house.co.jp/modules/d3blog/details.php?bid=20
?